

Online Teaching Resources
Programs, Resources, Guides, Courses, and Tutorials for Online Teaching
-
MSU Units Offering Programming and Services for Online Teaching
-
Academic Advancement Network (check out its longstanding page on Teaching & Learning)
- Repositories of Online Teaching Resources at MSU
- Repositories of Online Teaching Resources Outside of MSU
-
Free Online Workshops/Tutorials/Courses for Online Teaching at MSU
-
Summer Online Instructional Readiness Educational Experience (SOIREE) workshop (~20 hours to complete) five-day synchronous, facilitated workshop from July 13-17 or August 17-21 register here (participation is limited to 200 people on a first-come, first-served basis)
-
ASynchronous Program for Instructional Readiness (ASPIRE) workshop (~20 hours to complete) asynchronous, self-paced workshop that opens on June 15 enroll here
-
MSU’s Master of Arts in Educational Technology Mini-MOOC on Remote Teaching
-
MSU College of Education Micro-Credential in Online College Teaching - four-week, intensive cohort experience offered asynchronously with option synchronous check-ins and discussion opportunities facilitated by skilled instructors first offering begins in early July; second offering begins in early August participation by College nomination only (SOC deadline is June 24; College deadline is June 25). 100 total seats for each of two sessions.
-
Assessment Options Beyond the Exam: High-Impact Assessment Design online workshop register here. 90-minute workshop from 10:30a-12:00p on July 28, July 29, and August 19 will focus on formative assessments and alternatives to traditional exams and quizzes such as projects, posters, and reflections will also focus on technological approaches for giving feedback at scale.
-
Exam Design online workshop- register here for 90-minute workshop from 12:30p-2:00p on July 28, July 29, and August 19 will focus on resources and help with academic integrity on summative quizzes and exams will focus on writing multiple-choice and short-answer questions, creating a climate of integrity in the course, the pros and cons of video proctoring, and creating exams specifically in D2L.
-
Hybrid Teaching Primer course - builds on the online teaching skills covered in the SOIREE and ASPIRE workshops, a 6-8 hour primer for instructors of courses scheduled to be offered in a hybrid format for fall 2020, will cover hybrid pedagogy and models for hybrid courses that will help you maximize the benefits of both in-person and online modalities. Self-enroll in this workshop for the week of August 10 or the week of August 24.
-
-
Selected Online Exam Resources
-
a Remote Assessment Quick Guide (download here)
-
Exam Strategy for Remote Teaching (download here)
-
MSU has an institutional subscription to Respondus, a company specializing in online exam proctoring with two key services: monitor and lockdown browser
-
-
Free Online Workshops/Tutorials/Courses for Online Teaching Outside of MSU
-
Alpha Kappa Delta (AKD) and the ASA Section on Teaching and Learning are offering three online workshops; they are free but require pre-registration
-
-
Suggested Syllabus Language/Template
Here is a sample online syllabus in a downloadable Word format: https://socialscience.msu.edu/_assets/docs-online-teaching/MSU%20Syllabus%20Checklist%206-1-20final.docx
- Instructors should inform students in the syllabus about the alternatives planned to adapt the course for remote instruction if/when the pandemic might again force MSU into remote instruction
- This section reinforces earlier communication on syllabus language provided by the Council of Undergraduate Education Deans (CUED)
- The following should be included in syllabus materials and clearly communicated to students to ensure expectations are consistent:
- Office Hours: For fall 2020, all office hours should be via computer or telephone. No matter what the modality of the course, instructors are required to hold the number of office hours specified by their college. Indicate the platform that office hours will be held on and how appointments can be made outside office hours. Be explicit about communication channels and expectations (e.g., if you’ll need 24 hours to reply to student emails). Provide both a phone number and an email address for contact as appropriate. We suggest Zoom meetings and the use of a Zoom waiting room for office hours.
- Course Description: Instructors are responsible for ensuring that the content of the courses remains consistent with the course descriptions approved by the University Committee on Curriculum and the University Council. Please ensure that all class activities are clearly directed toward the fulfillment of course objectives and that student performance is evaluated in a manner consistent with these objectives. Please communicate that the mode of course instruction could change at any time given changes in public health guidance or changes in University operations.
- Required Textbooks and Course Materials: Include detail such as the full title of each textbook, author, edition, ISBN, and where it can be purchased. If a required text is available online, indicate where it can be accessed. Specify any additional materials, including software and hardware, that students must purchase for the course. Describe how students can access all technologies that will be used. Identify the hardware or software, if any, that is required for assessment (e.g. a webcam). In selecting and preparing materials abide by the MSU Accessibility Policies. For recommended texts and other readings and resources, state clearly how and where to access these materials, especially for online courses. You can find additional instructional support here.
- Course Schedule: This must include the date of the final examination and tentative dates of required assignments, quizzes, and tests, if applicable. This should be arranged in a list by date or week.
- Grading Policy: The syllabus must make clear how students will be evaluated and specifically how final grades will be determined. This can be in the form of a detailed and complete rubric or chart. Grade percentages must be provided so that students may understand how their final grade will be calculated. If a grading curve is used, this must be shared, and instructors must let students know how the curve will be calculated. Include any information about required proctoring, and particularly in an online course; this includes proctoring sites, lockdown browsers, and software requirements necessary for proctored exams or assignments. Please include a statement to the effect that proctoring arrangements will be decided at the discretion of the instructor, or that all exams will be proctored using a specific method if that has been decided. Note as well that proctoring arrangements are subject to change in the event of an unanticipated circumstance.
- Staying Home or Self-Isolating when Appropriate: Include language that encourages students who need to quarantine themselves, have been sick with COVID-19 symptoms, tested positive for COVID-19, or have been potentially exposed to someone with COVID-19 to follow CDC guidance to self-isolate or stay home. Include language that clearly states that you will make accommodations for those who must miss class due to illness or self-isolation that will not harm their performance or put them at a disadvantage in the class.
- Cloth Face Coverings On Campus: Cloth face coverings are required for everyone on campus. Please include the following language in your syllabus:
- Face coverings must be worn by everyone (including all faculty, staff, students, vendors, and visitors) indoors and outdoors while on property owned or governed by MSU and while participating in MSU-related or MSU-sponsored activities. If you have a medical condition that may prevent you from safely wearing a face covering, you should contact MSU’s Resource Center for Persons with Disabilities to begin the accommodation process.
- Face coverings should (a) be non-medical grade to maintain supplies for health care use, (b) fit snugly against the side of your face, (c) cover your nose and mouth, (d) be secured with ties or ear loops, and (e) allow for breathing without restriction. Cloth face coverings should only be worn for one day at a time, and they must be properly hand washed or laundered before subsequent use. Face coverings may vary (for example, disposable non-medical face coverings or neck gaiters are acceptable).
- Failure to wear a face covering for those without an accommodation will result in the following: (1) A reminder of the requirement, the reason for it (to minimize spread), and a request to comply. (2) A request to leave the classroom if no compliance. (3) If no face covering compliance and the student refuses to leave the classroom, class will be dismissed. (4) Should an emergency develop that you feel cannot be resolved by classroom dismissal, consider calling 911 for assistance. Note: Calling the police should be the last resort for genuine emergencies and not used as a way to handle non-emergency conduct issues.
-
If there is an incident related to face coverings in class, instructors should immediately file a report with the appropriate academic unit leader (e.g., department head, director of academic affairs, or director) and, as soon as possible, produce a written record of the facts. For students who initially violated the requirement, but who chose to comply when addressed, consider an email or other communication to remind the student of the requirement for future classes and to engage the student in a conversation about the situation. It will be helpful to allow the student to explain their actions in a way that might help in the future. Important information on the compact compliance can be found here. More detail on University directives, including processes for sanctions can be found here.
-
Student-Friendly Strategies for Choosing Course Materials
Carin Graves, MSU’s Sociology subject specialist librarian, describes several student-friendly strategies when choosing course materials:
- Instead of using a textbook, create custom curriculum by linking to library-provided electronic resources, including e-books and chapters, journal articles, streaming video and music.
- Seek out subject specialist librarians https://lib.msu.edu/contact/subjectlibrarian/ to help you sift through our electronic resources to identify choices appropriate for your classes or to request a possible purchase of something in electronic format that we do not yet have.
- Consult with Susan Kendall (skendall@msu.edu) in the Libraries’ Office of Copyright https://lib.msu.edu/copyright/ about legal digitization of smaller portions of books that are not available electronically or with Tyler Smeltekop (smeltek5@msu.edu) in the Libraries Course Materials Program https://lib.msu.edu/about/coursemat/ about electronic coursepacks.
- Consider using open educational resources (OER) and textbooks that are free for students https://libguides.lib.msu.edu/oer. This may be an option especially for lower level courses. Regina Gong (gongregi@msu.edu), our OER librarian, is available to help you identify these.
- If you determine that only a commercial textbook will work for your class, seek out cost and availability information. Choosing a textbook that has an affordable online rental option can make a difference for those having difficulties ordering hardcopies of books.
- Please keep accessibility in mind by referring to Accessibility Guidance on the Use of Digital Content for Instruction (2019 Provost Memo), Accessibility of Library Collections, accessibility information/documentation of other course materials, or email accessibility@lib.msu.edu.
-
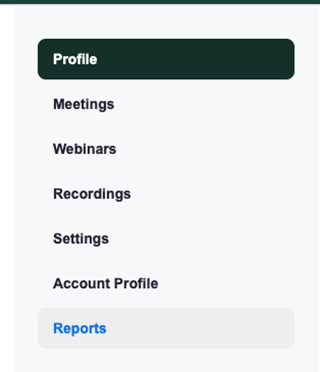
I need to know who attended my Zoom class for participation points. How can I check who attended after the Zoom session ended?
Reports for all Zoom sessions are saved in your account. After you log-in, click on the Reports tab on the left-hand corner. Then, you will be directed to your Usage Reports page where you will need to click on Usage. You will be able to select a specific date for your class or choose to see all the meetings you had for a maximum duration of 1 month. When you clicked on the time period you want a report for, you will be able to see a list of your previous meetings under Topic. You will need to scroll your mouse all the way to the right of this screen to see Participants. Under Participants, click on the number and a screen will appear with every attendee’s username or email.
Step 1: Click on Reports
Step 2: Click on Usage Reports

Step 3: Select your desired time period
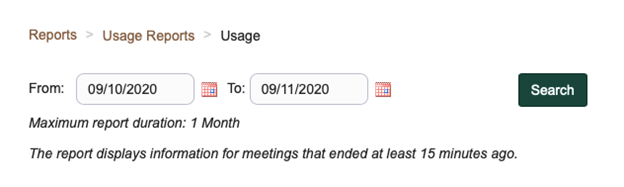
Step 4: After seeing your desired Zoom session, scroll to the right to see Participants tab and click on the number of participants.

Step 5: View the list of names for all attendees

-
I’m not sure if my synchronous sessions should use Zoom Meeting or Zoom Webinar. How do these two compare?
For class, instructors can either choose to set up a Zoom Meeting or Webinar. An in-depth comparison can be found here, below is a brief discussion of these features.
Zoom meeting: more interactive and for cases when you want everyone to participate, everyone can turn on their videos and audio and see who else is in attendance, Waiting Room feature where an individual waits for the host to begin the Zoom before seeing everyone else, host can create Break Out Rooms for people to split up into smaller sessions and host can hop between different rooms, preferably for small to large groups
Zoom webinar: ideally for when one or two people are hosts and doing most of the speaking, audience members cannot turn on video, allows view-only attendees, they can interact via Q&A, Chat, and answering poll questions, do not see everyone who is attending, preferably for large events and public broadcasts.
A webinar also includes a feature that allows students to virtually raise their hand.
In both cases, you can send invitations for individuals to register, add to your calendar and receive a reminder, and require passwords to enter.
-
I would like to know if my students understand a new topic by adding a multiple-choice poll to see how many students choose the right answer during our class. How do I add a poll to my meeting or webinar?
Zoom offers the options of adding polls to your webinar or meeting. In both cases, you can launch the poll during class and view the report on the results after the session has ended.
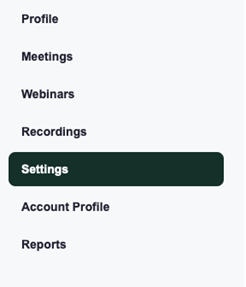
You will need to log-in and click on Settings. After you have been directed to the Settings page, scroll down to check if Polls are turned on by making sure it is blue. Then, you must have a meeting already scheduled for your class before it begins in order to create a poll. When you click on your scheduled meeting, you will scroll down to find the Poll option where you will be able to Add a new poll.
To launch the poll when the class begins, click on Polls in the meeting controls, then click Launch Poll. You will need to End Poll after everyone has answered and if desired, Share Results with the class. For additional help, you can follow Zoom’s instructions here. Additionally, you will follow similar steps for a webinar.
Step 1: Click on Settings
Step 2: Scroll down to turn on Polling

Step 3: Schedule your meeting (class)

Step 4: After the meeting has been scheduled, click on it. Then, scroll down to Add Poll.

-
How can I view the poll results after the class session has ended?
Similar to viewing the attendance report, you will need to click on Reports. Then, you will need to click on Meetings. Once you have been directed to your meetings page, select the desired time period. Additionally, you will select Poll Report to view the results.

-
What are break out rooms and should I use them?
You can think of breakout rooms as splitting up your class into groups/team if you were teaching face-to-face. As an instructor and the host of your session, you can assign students to split up into several different break out rooms. You also decide how long they will be in the breakout room and as a host, are able to enter and exit the breakout rooms. After the breakout sessions has ended, the students will be directed back to the larger class session. This can be a useful option if you have group assignments, peer review projects, or would just like your students to get to know each other better.
-
How do I create a breakout room?
Similar to enabling your Polling, you will need to turn on Breakout rooms in your settings.

As a host, once the session begins, you will be the only one to see the breakout button. Once you click the button, you will be able to decide how many rooms you would like to create and how many participants per room. After you completed these steps, your participants will be able to join their breakout rooms. For more information on how many participants can be in one breakout room and how many breakout rooms a host can create, you can read more here.
-
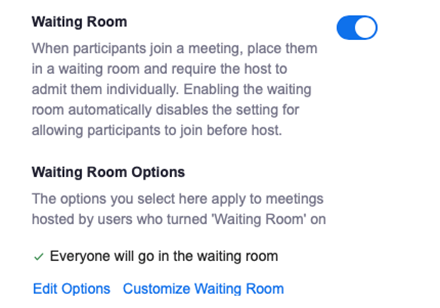
What is a waiting room and should I use it?
A waiting room allows all the participants that have click to join the Zoom session to wait until the host begins the session. Before the host enters into the session, the individual in the Waiting Room are not able to see or speak to each other. This is an option if you do not want the students to begin talking amongst themselves before you enter into the class.
-
How do I create a waiting room?
Similar to the Polling and Breakout room enabling process, you will need to click on your Settings and make sure that your waiting room is enabled and blue. Once this is enabled, all of your meetings will place your participants in a waiting room until you enter the session.
-
How do I record my lecture and upload it to D2L at a later time?
If you choose to record a live lecture on Zoom, you can click the Record button located in the bottom toolbar. You can either record to your computer or to the cloud which will be saved in your Zoom profile. After you end your Zoom session, the recording will convert to a file. If you recorded to your computer, the file will be in your Documents file in a sub folder titled, “Zoom.” If you saved to the cloud, you will need to go to your “Recordings,” then select the desire time period and find your recording. After you found your video, you can save it to your computer, and upload it to D2L for students to view. This is beneficial and different from uploading a pre-recorded lecture in that it allows for students to also view questions asked in real time and an instructor’s responses, which a pre-recorded lecture does not account for.
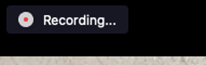
Step 1: Click on Recording before beginning the lecture

Step 2: To confirm your video is being recorded, look for a recording icon at the upper left-hand corner of your Zoom session and for a pause/stop recording button in your bottom toolbar.

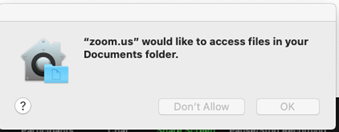
Step 3: After you end your Zoom session, you will be asked for access to your files. If you want the video recording to be saved locally to your computer, click “OK.”
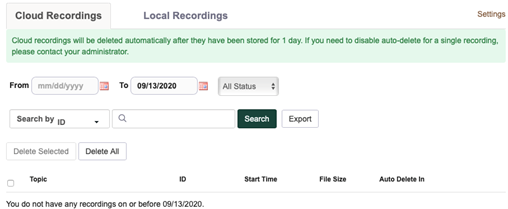
Step 4: To find your recordings in Zoom, click on Recordings on the left-hand corner of your profile.

Step 5: Select the desired time period and select the specific recording.
Step 6: Log-in to your D2L class. Under the desired folder, you can “Upload a File” and select the Zoom recording for the class to view

Select My Computer for the locally saved recording

-
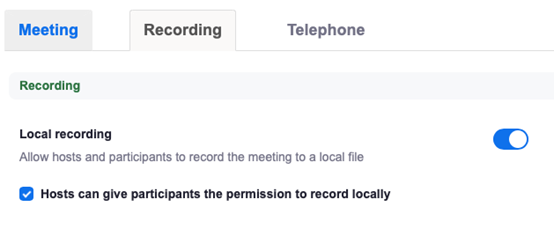
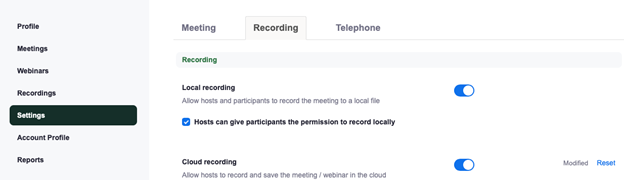
How can I allow students to record the lecture on their own?
Click on Settings in your profile. Then click on Recording. Be sure to enable “hosts can give participants the permission to record locally.”
-
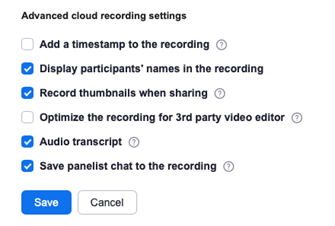
How can I make my recording ADA accessible?
If there are students in your course who require audio transcriptions of your recordings, you can enable this feature in Zoom. After clicking on Recordings on your profile, be sure to enable your Cloud Recording. After this button has turned to blue, click “audio transcript” which will allow Zoom to automatically transcribe the lecture that you recorded to your cloud.
Step 1: View your recording settings and enable Cloud Recording so it is blue.
Step 2: Enable Audio Transcript under Advanced Cloud Settings.
-
How do I create a gradebook?
A gradebook on D2L allows for your students to stay on track of their points and current GPA in the course.
Step 1: Click on Assessments à Grades
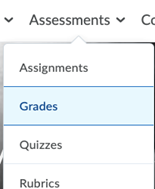
Step 2: Click on Setup Wizard. Scroll down and click Start.
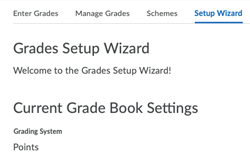
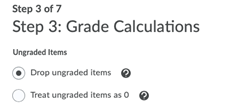
Step 3: You will need to set up your gradebook according to how you want it. Most gradebooks use a point system.
According to D2L HelpDesk, some instructors prefer to “drop ungraded items” during the semester but at the end of the course, go back to this setting and change it to “treat ungraded items as 0.” Students will only see what has been graded. This can be helpful as some students can get confused or uneasy seeing a 0 if you have not yet graded it during the semester.
-
How do I create my assignments?
After you have created your gradebook, you can now create the point distribution for your assignment. To do this, click on Manage grades.
Step 1: Click on Manage grades

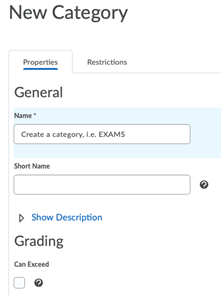
Step 2: Click on New -> Category. A category can be thought of as the larger assignment type and an item are all the assignments that fall under this category. For instance, a category can be “Exams” and then you will need to make new items for each exam, i.e. separate items for Exam 1, Exam 2, Exam 3, and so on.

Step 3: Title your category, indicate your points preferences, and decide if you would like there to be extra credit or bonus points (if yes, you can click on “can exceed” meaning the points can exceed what the assignment is out of).
Step 4: Click on Restrictions and indicate when you want the assignment to begin and end. If you choose to do an end date, this will mean the student cannot access the assignment box after the end date. If you leave this unmarked, then the student will still be able submit late work.

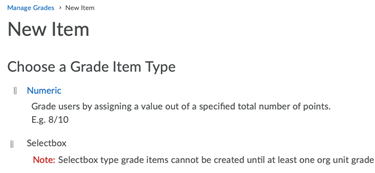
Step 5: Create an Item. Most instructors typically choose Numeric. Be sure that you place your item into the appropriate category, i.e. place item Exam 1 under category Exams.

Step 6: View your assignments and the points assigned to each

Alternative option for creating an item:
You can also create an item in your Assignments tab instead of the Grades tab. To do so, click on Assessments -> Assignments -> New.
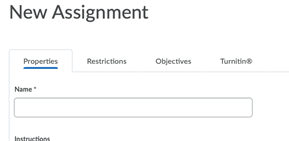
Step 1: View your Assignments.

Step 2: Create a New Assignment and select the category you want it to fall under.
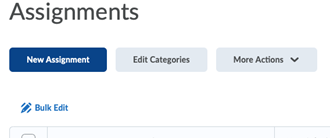
Under Properties, you can select your category.
After you have saved the assignment, you can return to your gradebook to confirm it saved appropriately.
-
How do I ensure students do not open other browsers during an exam or quiz?
D2L allows instructors to enable the LockDown Browser. To do so, click on Assessments -> Quizzes -> LockDown Browser.

-
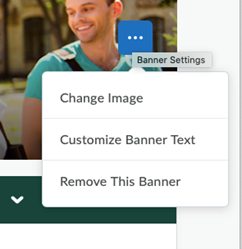
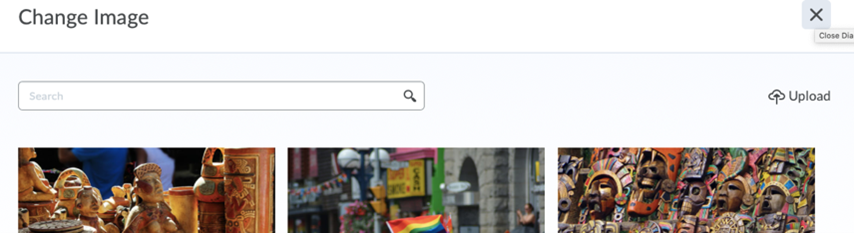
How can I make my D2L page more visually appealing to the student?
You can personalize the banner on your main webpage by selecting an appropriate stock image or uploading a photo of your choice.
Step 1: Click on the three dots on the right hand corner of your main webpage. To change an image to another stock photo or one you wish to upload, click Change Image.
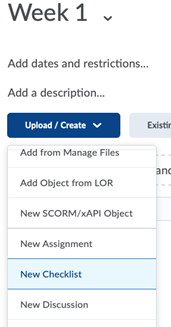
You can add images to each folder you create in your Content tab. After you have create your folder by clicking on “Add Module” you can then click on the “Add Description..” text which will then allow you to upload a photo by clicking on the camera icon.
Step 1: Click on Add Description.

-
How can I help keep students on track with their weekly assignments?
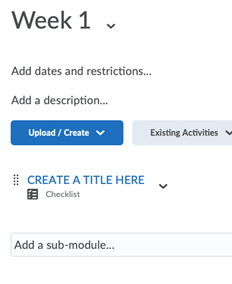
Create a checklist for students to mark off each assignment they complete.
Step 1: Under your desired module (weekly folder), click “create” a New Checklist.
Step 2: Create a title
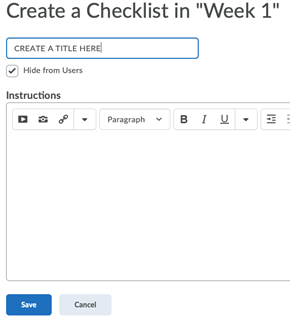
Step 3: Create your list

Step 4: Return to your folder and find the checklist to confirm it has been saved.
-
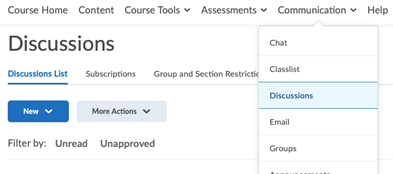
How do I create a discussion forum?
To create a discussion forum that allows for students to respond to each other, you must enter the Communication tab -> Discussion.
Step 1: Enter the Discussions page.
Step 2: Create a new discussion forum.

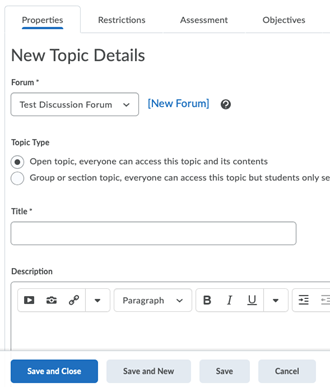
Once you created the new forum, be sure to then return to the discussions page, find the forum you create, and click on the dropdown to then create a Topic.
Step 3: Create a Topic for the forum by clicking on the forum’s dropdown arrow.

You will then be able to title your topic, add the instructions under Properties. You can also change the Restrictions, such as if you prefer the forum closes after the due date to prevent students from submitting late work. Lastly, you can ensure the grades appear in your gradebook by clicking on Assessment and indicating what grade item this discussion post should appear under.
After this has been created, students will be able to respond to each other.


-
What is the Calendar feature?
When you create due dates for your assignments and quizzes/exams, these dates will appear in your students calendar to notify them of upcoming work they need to complete. The calendar will appear on the main page of your course web page at the right hand corner. You can find a larger grid view of the calendar under Course Tools -> Calendar.


-
How can I see what my course looks like to the student?
You can change your view of the course by doing a Role Switch to Student View.
Step 1: Enter the main page of your course and scroll to the bottom. Find the Role Switch tab
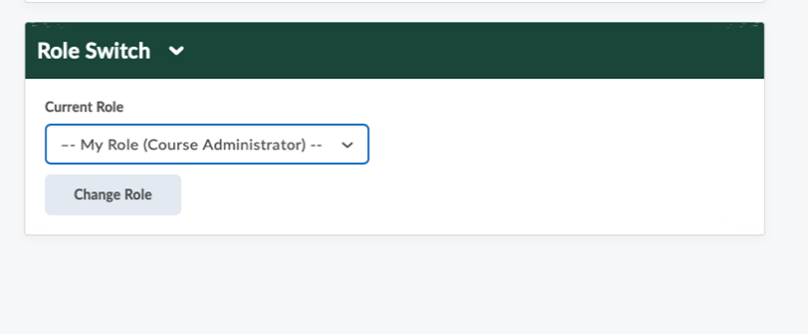
Step 2: Click on the dropdown menu, find Student View, and then Click Change Role
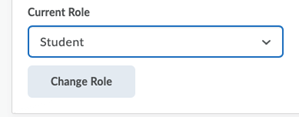
You will need to do the same steps to return back to Course Administrator view
-
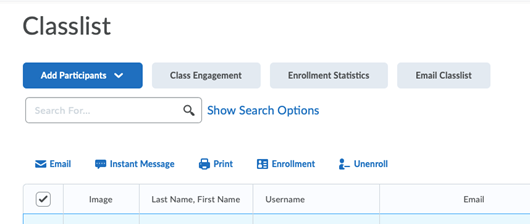
How can I send an email to the entire class list?
You can either send an email to the class list first accessing the Classlist tab or the Email tab. Below will be steps for each option.
Option 1
Step 1. Under Communications, click on Classlist

Step 2. Be sure to click on the box under email to select all of the class names, then click on email. You will then open an email box to compose your email with everyone under BCC.
Option 2
Step 1. Under Communication, click on email
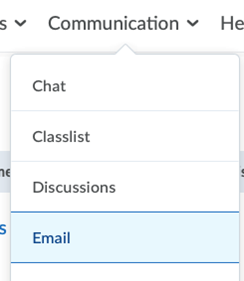
Step 2. Then click on compose

Step 3. Click on the address book. You will then see a list of class members’ names. Click on the box above everyone’s name to automatically select every name. Then, click on BCC

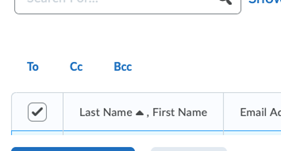
Step 4. Click “add recipients.” The page will then briefly refresh and add the names of the class members to your email and it will be ready to send to the entire class. You will also receive a copy of the email sent to you

-
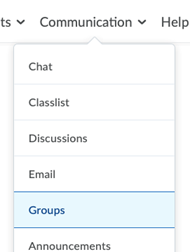
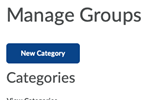
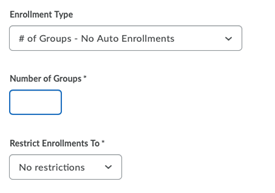
How do I create groups in D2L?
D2L groups can be helpful for online collaborative work, such a peer review assignment. D2L allows you to decide how many groups you want and how many individuals to enroll in each group. You can allow D2L to automatically enroll users or manually select who you wish to group.
Step 1. Select groups under Communication.
Step 2. Click on New Category.
Step 3. Create a category name, such as “Peer Review Groups” for example.

Then, select the number of groups you want based on the number of students in the course and how many people you want in each group.
Under enrollment type, select # of groups – no auto enrollments, if you wish to manually group people. If you prefer that D2L randomly groups students, you can select # of groups under the dropbox.
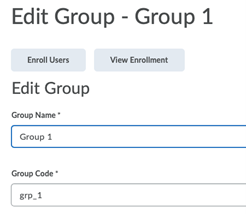
Step 3. To manually enroll students, click on each group.
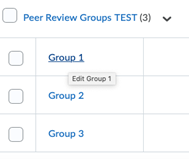
Then select “enroll users” to find students.
-
How do I create an assignment for these groups?
One of the best options for linking an assignment to group work is through a discussion forum.
Step 1. Similar to the above instructions on creating a discussion forum, you will need to create a New Topic. However, for group work, you will be selecting “group or section topic” on under topic type.
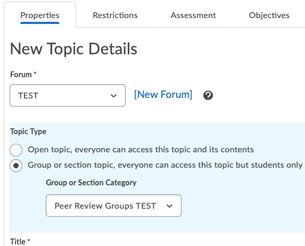
Step 2. You will then link the specific group work assignment to the forum. If you already have the assignment created in your gradebook, you will see it under grade items and can select to link it. If you need to create the grade item, you can do so by clicking on “new grade item.”

-
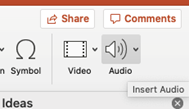
How can I add my own audio to my PowerPoint?
PowerPoint allows you to self-record for each slide you create. To do so, you will need to add Audio icons to each slide.
Step 1: Click on Insert
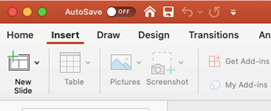
Step 2: Scroll all the way to the right to find the Audio Icon
Step 3: Click on the dropdown arrow on the Audio icon and select Record (be sure that your microphone is enabled on your computer/laptop).
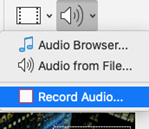
Record your material for the slide.
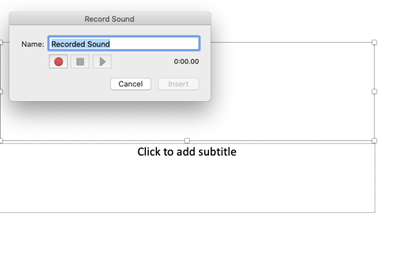
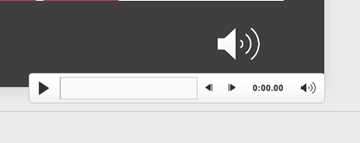
Step 4: After you have paused your recording, you will click on Insert and add the Audio Icon to a place that is easily visible to students on your slide. They will then be able to click Play and hear your recording
-
How can I create closed captioning for my PowerPoint lectures?
When you play your PowerPoint slideshow, each slide with audio will have accompanying closed captioning, although there may be delays or spelling errors.

-
How can I record my PowerPoint lecture?
You can record your PowerPoint slideshow by clicking on Slide Show in the main toolbar. Then, you will be able to record your slideshow until you click End. You will then be able to save the recording to your computer and upload to D2L.


-
Where can I easily record and upload videos of my lectures for students in the course to view?
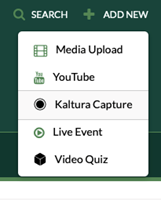
Kaltura MediaSpace makes recording and uploading videos easy and ensures that only the students in your class can view the materials. To do so, you will first need to log-in to your MediaSpace account using your MSU Net ID here. The log-in option is found under the Guest tab on the right hand corner.
If you only want to record a video occasionally, you can do so by clicking on Add New à Media Upload. After you have uploaded the content, you will have three options for publishing – private, unlisted, or published. Unlisted is a good option for students to access the content only if they have been shared the link. You will then be able to link it to D2L by visiting your D2L course page and choosing to upload a video – MediaSpace content will appear when you do this since both D2L and MediaSpace are using your MSU Net ID.
If you choose to upload several videos throughout the course, you will most likely want to create a channel where all the videos will be stored for your class to see.
Recording and uploading videos
Step 1: Log-in to your MediaSpace account

Step 2: If you want to record a video, go to the Add New tab, then click on Kaltura Capture.
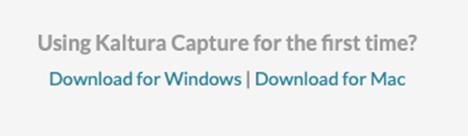
Step 3: Be sure that you downloaded the feature to your laptop or computer.
Step 4: After you finished your recording, it will be saved in My Media. You can also save the recording to your desktop.
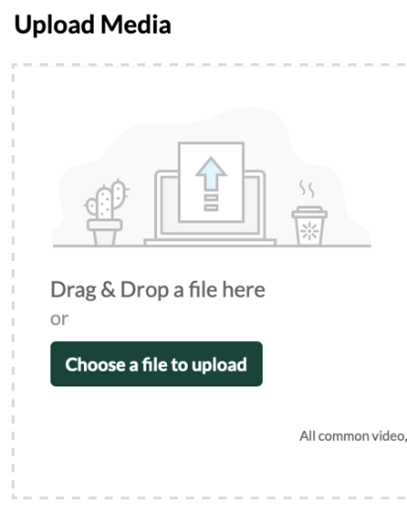
Step 5: If you wish to upload a recording or video from an external file, you can do so with the Media Upload option.

Step 6: You will have the option to pick the publishing status for your videos. Be sure that you not select Private for content that you want others to be able to view.

-
How can I create a channel for my class?
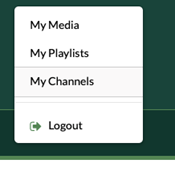
Step 1: Click on your name at the right hand corner and you will see a dropdown menu with the option, My Channels. Click on this.
Step 2: Click on create a channel

Step 3: Complete the necessary restrictions to the channel, such as choosing the viewing options. Your students will then be able to view and upload to this channel, which you can title the name of your course, e.g. “SOC 100, Fall 2020.”
